All the commands below should be run from the Unix or Linux shell. On
a Mac this is available through the Terminal application. You'll
need various pieces of software, which you may not yet have. On a Mac,
these are available through Homebrew, which you
should install. On Linux, they are available through
apt-get. On Windows,
install the
Windows Subsystem for Linux. The
instructions below are oriented toward MacOS and Homebrew.
We'll use the wget program, so first install that using homebrew:
brew install wget
Then get the main data file from the 1000-genomes ftp site:
wget ftp://ftp.1000genomes.ebi.ac.uk/vol1/ftp/data_collections/1000_genomes_project/release/20190312_biallelic_SNV_and_INDEL/ALL.chr22.shapeit2_integrated_snvindels_v2a_27022019.GRCh38.phased.vcf.gz
We'll also need the 1000-genomes mask file, which specifies the genomic positions that are accessible in 1000-genomes data. This file includes all chromosomes, so we'll have to restrict to chr22 later.
wget http://ftp.1000genomes.ebi.ac.uk/vol1/ftp/data_collections/1000_genomes_project/working/20160622_genome_mask_GRCh38/StrictMask/20160622.allChr.mask.bed
Get the portion of this mask that refers to chromosome 22.
grep ^chr22 20160622.allChr.mask.bed > 20160622.chr22.mask.bed
I used zless -S to examine the .vcf.gz file and determined that the
header line, which labels the columns of data, begins with "#CHROM". I
also determined that the labels of samples begin with the 10th field
of this header. The first sample is HG00096, and the last is
NA21144. We can use those two labels to make sure we've got all the
sample names. To get a list of samples in the entire data set, do
this:
gzcat ALL.chr22*.vcf.gz | head -n 100 | grep "#CHROM" |
tr "\t" "\n" | tail +10 > samples.all
(On Linux, gzcat is called zcat.) Checking this file, I find that
it begins with HG00096 and ends with NA21144, so it's clear that we've
got all the samples.
Now I need a list of the samples that go with the particular
population I'm interested in. I'm going to work with population CHB:
Han Chinese from Beijing. Browse to
https://www.internationalgenome.org/data/ and follow the link to
data portal. Under "Filter by data collection", choose "1000 Genomes
on GRCh38". Under "Filter by population", choose whatever population
you want to study. Then choose "Download the list". This creates a
file called igsr_samples.tsv in your Downloads directory, which I
moved into my smcpp directory. In that file, every entry in column 4
says "CHB", which tells me that I did indeed get that data for Han
Chinese from Beijing.
I only need the first column from this file, so I get rid of the rest like this:
cut -f 1 igsr_samples.tsv > samples.chb
Remove CHB samples that are not present in samples.all. We do this
using the unix join command, and this requires that both files be
sorted:
sort samples.chb > samples-sort.chb
sort samples.all > samples-sort.all
join samples-sort.chb samples-sort.all > samples.chb
We end up with a file called samples.chb, which has 106 entries rather than the original 109.
Next, I selected a subset of these 106 samples for analysis. If I
were working on a server at the Center for High-performance Computing,
I'd probably try to analyze the full data set. But many of us are
doing this on laptops, so let's keep the project small. To do this, we
can use the linux shuf (short for shuffle) command, which is called
gshuf on macos. It's in the coreutils homebrew package, so first
brew install coreutils
Then
gshuf -n 25 samples.chb | sort > samples25.chb
This generates a file called samples25.chb, which contains 25
samples from the CHB population, all of which are present in the
.vcf.gz file.
Install bcftools, unless you already have it:
brew install bcftools
Before making the new file, let's examine it to make sure it looks okay:
bcftools view --samples-file samples25.chb ALL.chr22*.vcf.gz | zless -S
This will pipe the first few lines of the new file into the zless command, where you can look at it. It should look like the original .vcf.gz file, but with only 25 samples. If it looks okay, then make the subsetted data file like this:
bcftools view --samples-file samples25.chb ALL.chr22*.vcf.gz \
--output-type z --output 1kgenomes-chb-chr22.vcf.gz
Here, "view" says that we want a new .vcf file, "--samples-file" says that the next argument is a file lists the samples we want to include, "--output-type z" says the output should be compressed, and the remainder specifies the name of the output file.
Smc++ requires that our data file have an index, so let's create one
using the tabix command. This should already be on your computer,
because you have already installed bcftools. Here's the command:
tabix 1kgenomes-chb-chr22.vcf.gz
Above, we downloaded a file called 20160622.allChr.mask.bed, which
is in bed format),
and describes the regions of the human genome that are covered by
1000-genomes data. Below, we will need a bed file describing the
regions not covered. To convert the one to the other, we'll use
bedtools. If you don't have that on your computer, the first step is
to download it:
brew install bedtools
We'll need to run bedtools complement, which you can find out about
by typing
bedtools complement --help
Note that the -g argument specifies a file that describes the size
of the chromosome. In our case, this file will contain only one line:
chr22 <chromosome size>
where the two fields are separated by a tab, and <chromosome size>
is the size of chromosome 22 in genome assembly GRCh38. You can find
that size here. It
equals 50818468. Thus, you'll need to create a file called
chr22.genome, which contains just the following line:
chr22 50818468
and where the two fields are separated by a tab.
Now we can use bedtools to construct the mask we need:
bedtools complement -L -i 20160622.chr22.mask.bed \
-g chr22.genome > tmp.bed
This creates a file called "tmp.bed", which specifies all the sites on
chromosome 22 that are not present in the 1000-genomes data set. The
-L option tells bedtools to restrict its output to chromosome 22.
Unfortunately, the chromosome labels in this file are not compatible with those in the .vcf file. In the .bed file, the chromosome label is "chr22". In the .vcf file it is just "22". So we need to rewrite "tmp.bed". Here's how
awk '{printf("22\t%s\t%s\n", $2, $3)}' tmp.bed > inaccessible-mask.bed
This creates "inaccessible-mask.bed", and now the chromosome labels are consistent.
smc++ will want this bed file to be compressed in bgzip format:
bgzip inaccessible-mask.bed
This generates file inaccessible-mask.bed.gz. We also need an index:
tabix inaccessible-mask.bed.gz
Docker can be downloaded from from their website. Once docker is on your system, type
docker run --rm -v $PWD:/mnt terhorst/smcpp:latest
This generates an error message, which you can ignore.
This file is created from the .vcf.gz file that we created above. The first step is to construct the smc++ command line. Mine looks like this:
docker run --rm -v $PWD:/mnt terhorst/smcpp:latest \
vcf2smc \
--mask inaccessible-mask.bed.gz \
--length 50818468 \
1kgenomes-chb-chr22.vcf.gz chr22.smc.gz 22 \
CHB:$(cat samples25.chb | xargs echo | tr " " ",")
Bash will treat this as a single command, because the "newline"
characters that terminate lines have been "escaped" by putting a
backslash ("\") at the end of all lines except the last. There should
be no spaces or tabs following "\". The 1st line above has all the
docker stuff. The 2nd (vcf2smc) specifies the program within smc++
that we want to execute. This one converts from vcf format to smc
format. The 3rd line specifies the mask. The 4th gives the length of
the chromosome. (This isn't necessary if that length is available in
the ##contig line of the .vcf.gz file.) The 5th gives the input and
output files and the chromosome label. The 6th line should have format
<population label>:sample1,sample2,sample3
In my case, "CHB" is the population label, and the sample names are
stored in file samples25.chb. The stuff within $(...) is a shell
command that generates a comma-separated list of sample names. The
shell will append this to the command line just after "CHB:".
Before running the docker command at the shell command line, click on the docker icon, which looks like a whale. This will start the docker daemon, and then you can run the command above--the one that begins "docker run ..."--from the bash command line.
Create a directory for the output:
mkdir output
Then run
docker run --rm -v $PWD:/mnt terhorst/smcpp:latest estimate \
-o output 1e-8 chr22.smc.gz
Here, 1e-8 is the mutation rate. In real research, we'd look for the
latest and best estimate of this rate, and we'd justify that choice in
the publication.
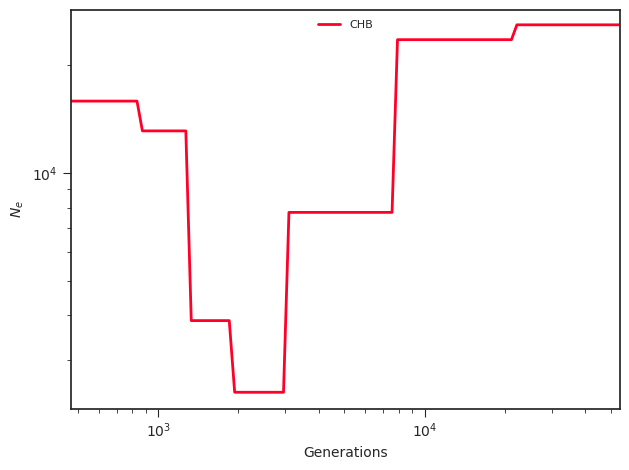
Run
docker run --rm -v $PWD:/mnt terhorst/smcpp:latest plot \
output/plot.png output/model.final.json
You'll find a new file in the output directory called plot.png. Mine
looks like this: